L2TP (Layer 2 Tunneling Protocol) – Support is built into Windows. To create a secure VPN, it is used in conjunction with IPsec.
The Layer 2 Tunneling Protocol is built based on PPTP and the proprietary L2F protocol developed by Cisco. Unlike PPTP, L2TP does not use a dedicated control channel. All control messages are sent through the tunnel. The problem of PPTP and its likes related to passing through NAT, due to the lack of ports in GRE, is solved in L2TP by encapsulating tunneled data into UDP (port 1701). As a result, user data is wrapped like a cabbage in a whole bunch of headers, plus a PPP trailer on top.
The implementation of the MPD multi-link protocol has unified support for the following connection types: L2TP, PPTP, and others.
Installing and Configuring an L2TP VPN Server on Ubuntu Server
This method is suitable even for beginners in system administration. To start, you can review the information from the developer of the IPsec VPN Server Auto Setup Scripts on the GitHub resource. The script uses the IPsec (Libreswan) and L2TP (xl2tpd) protocols. This script has been tested and verified to work on Ubuntu 20.04 (Focal), Ubuntu 22.
apt update
wget https://get.vpnsetup.net -O vpn.sh && sudo sh vpn.sh
If you want to run the script with your own credentials to access the VPN server, run the command and then edit the vpnsetup.sh file in the Nano editor. Replace these variables with your own data: YOUR_IPSEC_PSK, YOUR_USERNAME and YOUR_PASSWORD.
wget https://get.vpnsetup.net -O vpn.sh
nano -w vpn.sh
In automatic mode, the script will create a ready-to-use L2TP VPN server and will also generate credentials to access the VPN server, looking something like this:
IPsec VPN server is now ready for use!

Connect to your new VPN with these details:

Server IP: xxx.xxx.xxx.xxx
IPsec PSK: djsXsLpgShVENZY3WRS
Username: vpnuser
Password: 7Vjjuo5l6Wzke4x

Write these down. Youll need them to connect!

IKEv2 setup successful. Details for IKEv2 mode:

VPN server address: xxx.xxx.xxx.xxx
VPN client name: vpnclient

Client configuration is available at:
/root/vpnclient.p12 (for Windows & Linux)
/root/vpnclient.sswan (for Android)
/root/vpnclient.mobileconfig (for iOS & macOS)
The work on the server is completed, login credentials have been obtained, and all that’s left is to configure the VPN client on your computer (or smartphone) to gain access to our VPN server.
Advantages and Disadvantages of L2TP/IPsec
Before deploying the server, it is worth evaluating the strengths and weaknesses of this combination of protocols to understand whether it fits your tasks.
Pros:
- Built-in support: Clients are integrated into almost all popular OS (Windows, macOS, iOS, Android). There is no need to install third-party software.
- High security: L2TP by itself does not encrypt traffic, but in combination with IPsec (which uses AES-256 algorithms), it provides enterprise-grade protection.
- Stability: The protocol is excellently documented and predictable in operation.
Cons:
- Problems with NAT: Due to operational specifics, the protocol often requires additional registry settings on the client side (which is described in detail below).
- Low speed on weak devices: Due to double data encapsulation (L2TP inside IPsec), CPU overhead increases, which can reduce speeds on cheap routers or old smartphones.
- Easily blocked: The protocol ports are fixed, so providers or TSPU/DPI systems can block such a VPN connection in a single click.
Configuring L2TP/IPsec Client in Windows 11
- Select Start > Settings > Network & Internet > VPN > Add VPN.
- In the Add a VPN connection section, perform the following actions:
- In the VPN provider field, select Windows (built-in).
- In the Connection name field, enter a name that makes sense to you (for example, “My Personal VPN”). This is the name of the VPN connection you will look for to connect.
- In the Server name or address field, enter the address for the VPN server.
- Select the VPN type from the list as “L2TP/IPsec with pre-shared key”.
- Pre-shared key — enter our IPsec PSK.
- Type of sign-in info — select “User name and password”.
- User name and password — fill out these fields.
- Click Save.
When trying to connect, you will most likely receive an error: “The network connection between your computer and the VPN server could not be established because the remote server is not responding. This could be because one of the network devices (e.g, firewalls, NAT, routers, etc.) between your computer and the remote server is not configured to allow VPN connections. Please contact your Administrator or your service provider to determine which device may be causing the problem.”
To solve it, if the L2TP/IPsec VPN server is behind a NAT, then for external clients to connect correctly through the NAT, it is necessary to make a change in the registry both on the server and on the Windows client, allowing UDP packet encapsulation for L2TP and support (NAT-T) for IPsec. And even if the server is not behind a NAT, do as indicated below anyway – it’s Windows after all 🙂
- Open the registry editor
regedit.exeand navigate to the branch for Windows 10, 8.1, 7 and Windows Server 2016, 2012R2, 2008R2 —HKEY_LOCAL_MACHINE\SYSTEM\CurrentControlSet\Services\PolicyAgent - Create a DWORD parameter named
AssumeUDPEncapsulationContextOnSendRuleand set its value to2
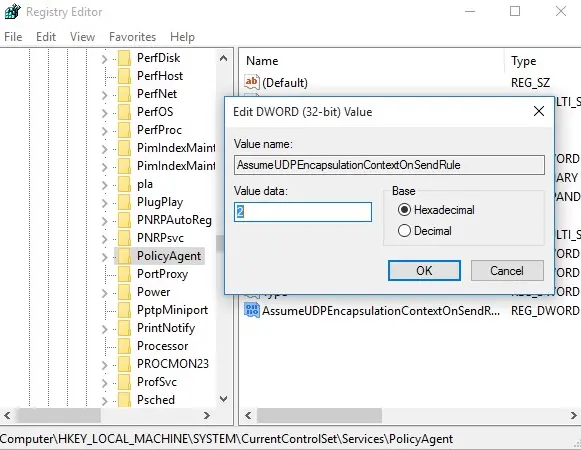
Possible values for the AssumeUDPEncapsulationContextOnSendRule parameter:
- 0 – (default value), assumes that the VPN server is connected to the internet without NAT;
- 1 – the VPN server is located behind a NAT;
- 2 — both the VPN server and the client are located behind a NAT.
All that’s left is to restart the computer and make sure that the VPN tunnel is successfully established.
Conclusion
The L2TP/IPsec combination is a time-tested, classic solution for creating a VPN. Its main advantage lies in “out-of-the-box” availability: once you set up the server, you will be able to connect Windows workstations or mobile devices to it without downloading third-party utilities like OpenVPN or WireGuard.
However, considering architectural features (difficulties passing through NAT and vulnerability to DPI blocks), this protocol is chosen more often today for organizing access to a secure perimeter within corporate networks. For personal use under strict provider restrictions, it is also worth paying attention to modern alternatives with traffic obfuscation.
 Top Temporary VPS for Testing & Experiments (2026)
Need a fast cloud server for a few hours or days? Deploy an isolated testing environment, run your scripts, and destroy it without any monthly commitments. Secure payments via Crypto (USDT) & PayPal supported.
• Exclusive Welcome Bonus: Get an extra 15% on your first balance top-up within 24 hours after registration.
• Best-in-class Storage VDS configurations with huge disk space for heavy data testing.
• High-speed hardware platform with a stable presence in the Netherlands (Europe).