SOCKS is a network protocol that enables client-server applications to transparently access services behind firewalls. Standing for “SOCKet Secure,” SOCKS is application-layer agnostic (OSI Layer 7) and operates at the session layer (Layer 5), routing traffic via TCP/IP.
What is a SOCKS proxy server?
Despite being established for decades, SOCKS remains a highly relevant alternative to HTTP proxies. It is protocol-independent: SOCKS4 supports TCP, while SOCKS5 extends this to both TCP and UDP. As a circuit-level gateway, a SOCKS proxy simply relays data between the client and the server without inspecting the underlying payload. This transparency allows it to handle any application-layer traffic, including HTTP, FTP, SMTP, POP3, and NNTP.
Since SOCKS relays all data between the client and the server without modification or header injection, the destination web server perceives the proxy as the originating client. Consequently, SOCKS proxies provide inherent high-level anonymity, as they do not leak the client’s original IP address or reveal the proxy’s presence through specialized headers.
When comparing HTTP and SOCKS5 proxies, SOCKS5 is generally the superior choice. It offers enhanced anonymity, a more robust feature set—including UDP support and various authentication methods—and universal compatibility with any application or protocol that supports proxying.
Dante Features
Dante is a stable, open-source SOCKS proxy server. In this guide, you will learn how to install and configure the Dante SOCKS proxy on a remote VPS. For projects where resource minimization is important, Dante is an excellent choice. It’s written in C, is extremely stable, and uses minimal RAM, making it ideal for use on low-cost VPS.
While the core server is free, certain advanced features are available as paid commercial modules. For instance, the Bandwidth Control module is priced at EUR 400.
To deploy your own SOCKS server, you will first need to provision a budget-friendly VPS and perform the initial setup.
Quick Installation of Dante Server on Ubuntu 24 LTS
For Ubuntu distributions newer than 18.04.4 LTS—specifically tested on Ubuntu 20.04.1 LTS (Focal), 22.04 LTS (Jammy), and 24.04 (Noble Numbat)—Dante Server is available out-of-the-box and can be installed directly from the official repositories.
Update the system repositories and install the necessary package:
sudo apt update && sudo apt install dante-server -y
Next, we need to wipe the default configuration and replace it with our own. You can overwrite the file using this single command:
cat <<EOF | sudo tee /etc/danted.conf
logoutput: syslog
user.privileged: root
user.unprivileged: proxy

internal: 0.0.0.0 port = 2080
external: $(ip -4 addr show eth0 | grep -oP '(?<=inet\s)\d+(\.\d+){3}' | head -n 1)

socksmethod: username
clientmethod: none

client pass {
    from: 0.0.0.0/0 to: 0.0.0.0/0
}

socks pass {
    from: 0.0.0.0/0 to: 0.0.0.0/0
    user: iryna
}
EOF
Note: If your server’s network interface is named something other than eth0 (uncommon but possible), the service may return an error or fail to start. However, eth0 remains the standard for 99% of VPS/VDS environments. To verify your interface name, run: ip link show or ip addr
Creating a Proxy User and Launching the Service. Create a dedicated user (e.g., proxystaff01) with a non-login shell for security, then set a password:
sudo useradd -m -s /usr/sbin/nologin proxystaff01 && sudo passwd proxystaff01
The system will prompt you to enter the password twice. Ensure you use a strong, unique password and store it securely.
Allow the proxy port through the firewall (UFW), then restart the Dante service and enable it to start on boot:
sudo ufw allow 2080/tcp
sudo systemctl restart danted && sudo systemctl enable danted
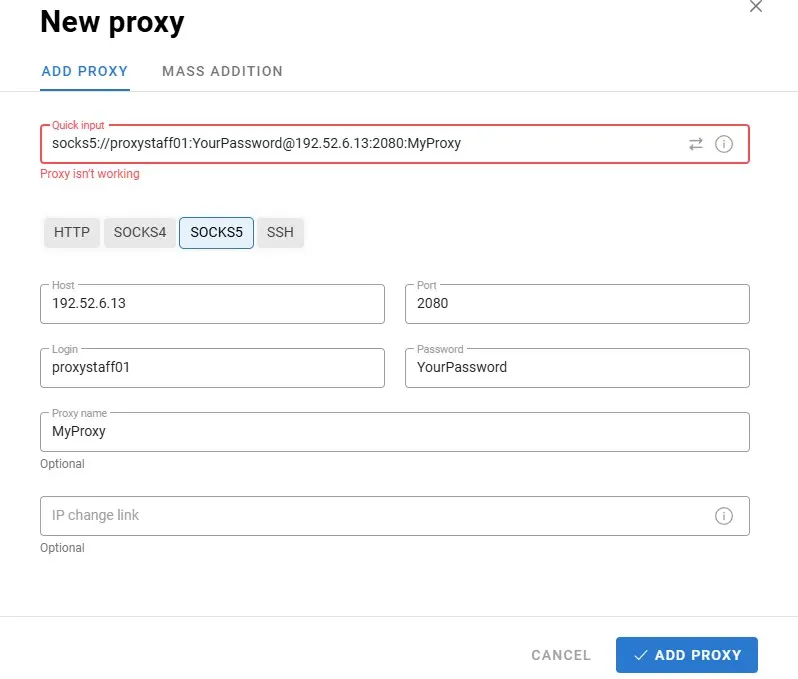
How to Use Your New Proxy
Launch the Dolphin {anty} browser, create a new profile, and navigate to the “Proxy” section. Select SOCKS5 as the proxy type and enter the following connection details:
| Field | Value |
| Proxy Type | SOCKS5 |
| IP Address | Your VPS server’s public IP |
| Port | 2080 |
| Login | proxystaff01 |
| Password | The password you created in the previous step |
Troubleshooting Common Issues
If the Dante service fails to start or behaves unexpectedly, you need to identify the root cause. The most effective way to do this is by running the daemon manually in the foreground to view the real-time debug output.
1. Manual Debugging
Run the following command to see detailed error messages:
danted
Common Error: Authentication Not Configured If you see the following log entry, it means your configuration lacks a valid authentication method:
warning: checkconfig(): no socks authentication methods enabled. This means all socks requests will be blocked after negotiation
This alert indicates that while the server is running, it will reject all incoming traffic because it doesn’t know how to verify the user. Ensure your danted.conf includes socksmethod: username (or none for an open proxy).
2. Resolving “Read-only file system” Errors
In recent Ubuntu versions, systemd sandboxing may prevent Dante from writing to its log file, even if the permissions are correct. You might encounter an error like this:
alert: configparsing(): could not (re)open logfile "/var/log/socks.log": Read-only file system
To fix this, you must modify the systemd service unit to allow write access to the /var/log/ directory.
Step-by-step fix:
- Open the service file: sudo nano /lib/systemd/system/danted.service
- Locate the line starting with ReadOnlyDirectories and add ReadWriteDirectories=/var/log at the end of the section. It should look like this: InaccessibleDirectories=/boot /home /media /mnt /opt /root ReadOnlyDirectories=/bin /etc /lib -/lib64 /sbin /usr /var ReadWriteDirectories=/var/log
- Save the file and exit (Ctrl+O, Enter, Ctrl+X).
Apply the changes and restart the service:
sudo systemctl daemon-reload
sudo systemctl restart danted
Summary of Debugging Commands
| Action | Command | Purpose |
| Manual Start | danted | View immediate configuration errors. |
| Check Logs | journalctl -u danted | View the service’s historical logs. |
| Reload Config | systemctl daemon-reload | Update systemd after editing .service files. |


Thanks for the clear config! One thing I’d like to add for those running Dante on a small VPS: be careful with the logoutput setting. If you set it to syslog or a verbose file without log rotation, it can eat up your disk space pretty fast under heavy load. I personally prefer adding logoutput: /dev/null once everything is tested and working, or at least narrowing it down to errorlog. Also, if you’re using it for high-concurrency tasks, tweaking the timeout.io values in sockd.conf can really help with overall performance.
Solid guide on Dante! It’s definitely one of the most stable SOCKS5 implementations out there. For anyone wondering about UDP support — Dante handles it perfectly, just make sure your firewall (ufw or iptables) actually allows the UDP port range you’ve specified in the config. Also, a quick tip for security: if you use method: username, remember that SOCKS5 transmits credentials in plain text. It’s best to combine it with IP-based restrictions in the client pass block to make sure only your specific IPs can even attempt to authenticate.