FASTPANEL is currently one of the best panels available. Installation is simple and detailed in the official documentation. In most cases, that will be completely sufficient. Below are the configurations you might need, primarily to speed up the operation of your websites.
Important note: Before diving into the detailed instructions, let me remind you of an important rule: any control panel must be installed strictly on a clean operating system. If you are deploying this platform for review or testing purposes, a great solution is a quick VPS rental for experiments with hourly billing. If you need to quickly pick a platform for a specific stack (Nginx, Docker, or Git), an interactive configurator is available on the main page of the hub—a server control panel with handy filters.
Installing FASTPANEL requires a virtual (VPS) or dedicated server with root access. I have shortened the list of supported operating systems because the developers’ announced support for CentOS 7 only brings a smile to necro-admins 🙂 In short, do not install on versions lower than these OS:
- Ubuntu 22.04, 24.04
- Debian 11, 12
- Rocky Linux: 8
- AlmaLinux: 8
Pros of FASTPANEL:
- Convenient configuration of mail server and DNS.
- WordPress installation directly from the panel.
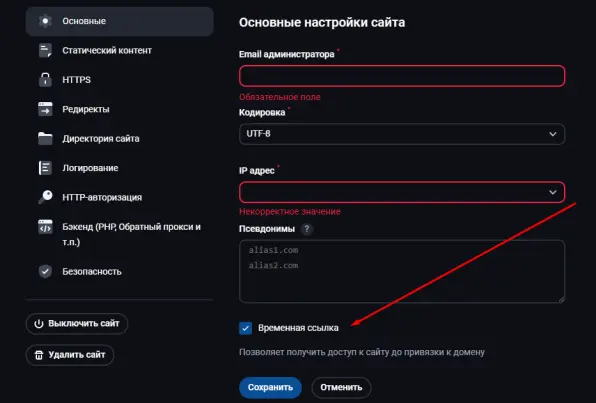
- A very useful feature is the temporary link, which allows accessing the site without changing the IP address in DNS. This is very handy when, for example, you are building a new version of a site or moving it to another hosting provider and want to check if your site works.
Cons (tested on Ubuntu 22 LTS):
- By default, the database is MySQL Server version: 8.0.39. Fortunately, the developers provided an option to change the database during panel installation, for example, to MariaDB 10.6. As of 2024, MariaDB version 10.5 or higher is recommended for WordPress. However, I failed to change the database version (see the section below).
- Oddities with firewall settings (iptables). Only the most basic rules are available, without taking IP addresses into account. It can certainly be configured, but only via the Linux console.
- Step 1: OS Package Updates
- Step 2: Possible Server Hostname Error
- Step 3: FASTPANEL Installation
- Step 3.1: Choosing the Installed Version: MySQL vs MariaDB
- Step 3.2: Can we install FASTPANEL now?
- Step 4: Obtaining a Free License
- Step 5: Nginx and PHP-FPM
- Step 5.1: Which PHP operation modes does FASTPANEL support?
- Step 6: OS Tuning
- Step 7: Configuring iptables in FASTPANEL (Updated 2026.02)
- Problems with configuring the firewall via the FASTPANEL web interface
- Solution
- Step 8: How to configure HTTPS access for FASTPANEL, RoundCube, and phpMyAdmin
- Step 9: Email Configuration in FASTPANEL
- Checking FASTPANEL Email Operation
- Step 10: Backups: Remote and Local Backup
- Step 11: Advanced Nginx Tuning (Global Buffer Optimization)
- Safe configuration via a global include
- Verification and configuration application
- How to verify that the configurations were applied globally?
- FAQ 1: How to reset the password to log into FASTPANEL
- FAQ 2: How to update the FASTPANEL panel
- FAQ 3: Nginx fails to start after VPS reboot (2 solutions)
- FAQ 4: How to run a Python bot in FASTPANEL
- Conclusion
Step 1: OS Package Updates
I recommend using the VPS selection service with current rates. It is great that these providers value their customers and maintain favorable conditions even when base tariffs change. They offer a wide selection of configurations, allowing you to choose the optimal choice for any need. In addition, they often run promotions and special offers for regular customers, which can significantly save on server rentals. They have excellent technical support that is always ready to assist with any questions.
Remember?!!!
Any hosting control panel can only be installed on a clean operating system without pre-installed software. Installation on a server with pre-configured software is impossible!
apt update
apt full-upgrade
reboot
If the kernel is updated, I recommend rebooting the OS and then continuing the installation process. Use the reboot command to restart.
Let’s install wget to download the FASTPANEL installer.
apt install -y -qq wget curl
Step 2: Possible Server Hostname Error
If your server name matches the domain of your website that you are going to add as a site in FASTPANEL, change the server name. If you do not do this, FASTPANEL might not allow you to add your domain.
You can check the current server name using the hostname command:
hostname -f
Change the server name in Linux with the command:
hostnamectl set-hostname mydomain
After the FASTPANEL installation is complete, add your domain, and only after that, if you plan to use this domain for sending emails, change the server name to the correct one. Then reboot the server so the mail server applies the changes.
Step 3: FASTPANEL Installation
Preparing for installation is the most crucial part—how you equip the ship determines how long it sails
Important! The panel can only be installed on a clean operating system without pre-installed software. Installation on a server with pre-installed software is impossible!
Step 3.1: Choosing the Installed Version: MySQL vs MariaDB
By default, FASTPANEL installs MySQL 8.0. I don’t like this choice. The developers provided an option to change the database, so let’s verify it.
wget http://repo.fastpanel.direct/install_fastpanel.sh && bash install_fastpanel.sh --help | grep 'Available versions'

Available versions: default|mariadb10.6|mariadb10.11
To install the required database version, use the -m key with the appropriate parameter:
bash install_fastpanel.sh -m mariadb10.6
Everything I wrote sounds wonderful, but the trick failed—MySQL 8.0 was installed anyway. Tough luck.
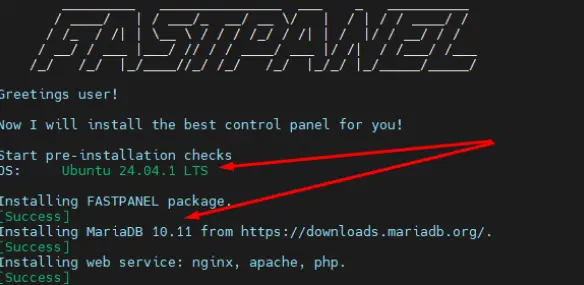
Joy! This means the panel is evolving and bugs are being fixed. Today I installed FASTPANEL on Ubuntu Server 24.04 LTS Noble Numbat and succeeded in installing the required database version:
Available versions: default|mariadb10.11|mysql8.0|percona8.0

bash install_fastpanel.sh -m mariadb10.11
Step 3.2: Can we install FASTPANEL now?
Let’s proceed directly to the default FASTPANEL installation; if you need to choose a specific database version, see the section above. Launching the installation:
wget http://repo.fastpanel.direct/install_fastpanel.sh -O - | bash -
We wait for the installation to finish and receive the access credentials (link, login, password) to the panel.
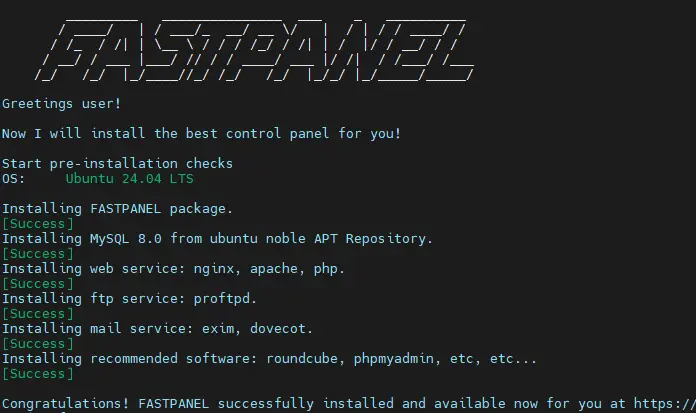
Congratulations! FASTPANEL successfully installed and available for you at https://1.2.3.4:8888
Login: fastuser
Password: password
Step 4: Obtaining a Free License
To order a license, you need to create an account on the website. The simplest way is to go to the web interface of your FASTPANEL, which will prompt you: “To issue a license, enter your email. Information about the created license and account, as well as a link to activate the license, will be sent to the specified email address.”
After receiving the credentials via email, you need to log in with them and issue the license. The license is activated instantly.
Step 5: Nginx and PHP-FPM
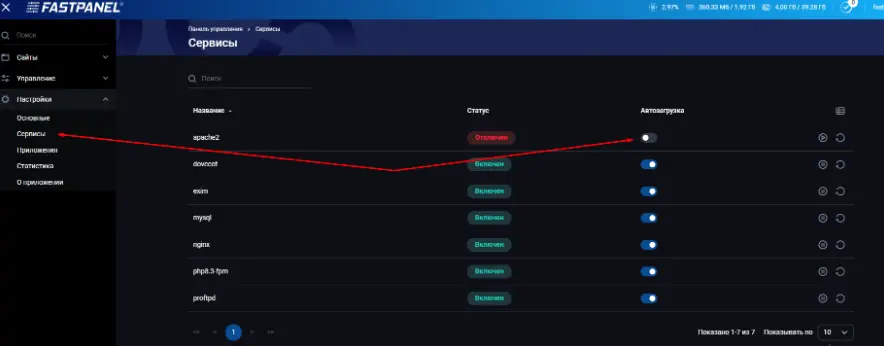
I believe that for standard websites, the combination of Nginx and PHP-FPM is the fastest. Therefore, in the website settings, I select the PHP-FPM mode, and completely disable Apache from startup:
Step 5.1: Which PHP operation modes does FASTPANEL support?
This section describes just for your information which PHP operation modes FASTPANEL supports. You might need one of them, but as I wrote above, I prefer Nginx and PHP-FPM.
You can choose one of the following operation modes:
- Apache Module (mod_php). In this mode, the server-wide version of PHP is used, and it is impossible to choose an alternative version. Nginx is used as the frontend server, and Apache as the backend. Scripts are processed by the mod_php module. Apache operates in MPM-ITK mode.
- CGI. You can choose alternative versions of PHP. Apache is used as the backend, and a separate PHP process is created for each request.
- FastCGI. You can choose alternative versions of PHP. Nginx is used as the frontend server, and Apache as the backend. Scripts are processed by the mod_fcgid module. Unlike CGI, a separate process is not launched for each script, which consumes fewer resources and increases website speed. In cases where an alternative version of PHP is required, it is recommended to choose this mode.
- PHP-FPM (Nginx + PHP-FPM). You can choose alternative versions of PHP. Nginx is used as the frontend server, and PHP-FPM as the backend. In this mode, the .htaccess file is not processed. All .htaccess settings must be specified in the Nginx configuration.
Step 6: OS Tuning
- Add the following lines to /etc/security/limits.conf:
www-data soft nofile 65535
www-data hard nofile 65535
or if you are not sure which user the webserver runs under, add it like this:
* soft nofile 65535
* hard nofile 65535
www-data soft nofile 65535
www-data hard nofile 65535
- Do not blindly copy text into this file /etc/sysctl.conf, read about these parameters beforehand sysctl:
#!/bin/bash

cat > /etc/sysctl.conf << TUNES
net.core.netdev_max_backlog=30000
net.core.somaxconn=65535
net.ipv4.tcp_syncookies=1
net.ipv4.tcp_max_syn_backlog = 720000
net.ipv4.tcp_max_tw_buckets = 720000
net.ipv4.tcp_tw_recycle = 0
net.ipv4.tcp_timestamps = 1
net.ipv4.tcp_tw_reuse = 0
net.ipv4.tcp_fin_timeout = 60
net.ipv4.tcp_keepalive_time = 7200
net.ipv4.tcp_keepalive_probes = 9
net.ipv4.tcp_keepalive_intvl = 75
net.core.wmem_max = 134217728
net.core.rmem_max = 134217728
net.core.rmem_default = 16777216
net.core.wmem_default = 16777216
net.ipv4.tcp_rmem = 4096 65536 33554432
net.ipv4.tcp_wmem = 4096 65536 33554432
net.ipv4.tcp_moderate_rcvbuf =1
net.ipv4.tcp_no_metrics_save = 0
net.ipv4.tcp_congestion_control=htcp
net.netfilter.nf_conntrack_max = 134217728
net.nf_conntrack_max = 134217728
net.ipv4.ip_forward=1
TUNES
sysctl -p /etc/sysctl.conf
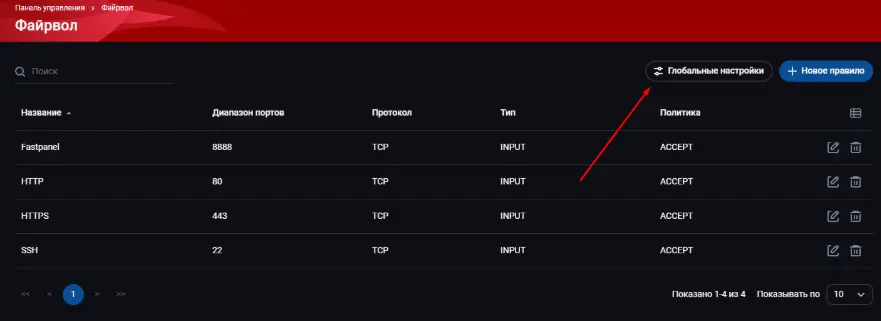
Step 7: Configuring iptables in FASTPANEL (Updated 2026.02)
In the FASTPANEL documentation, it states that you can allow/block by IP address via the web interface, but I currently have Ubuntu 24.04 on hand and that feature is missing there. You can only configure access by ports and that’s all.
By the way, UFW cannot be installed because it deletes the core fastpanel2 service.
A miracle! I found it or noticed it or the illusion lifted 🙂 I can now see how to add a rule with a specific IP. I can’t understand, did I just miss it before? 🙁
Ah, no :)) the possibility to add it exists, but the rule is generated without an IP, so we continue doing exactly as I wrote below.
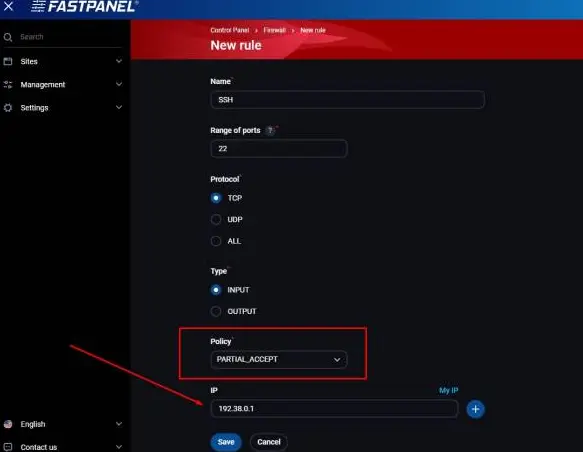
Problems with configuring the firewall via the FASTPANEL web interface
The minimum secure configuration of iptables FASTPANEL via the web interface. Default rules in the “Global Settings” menu: Everything that is not explicitly allowed is forbidden.
Problems arising with this setup:
- If you use IPv6, everything will be blocked, including the ping utility for this protocol.
- There is no way to restrict access to SSH and the panel only to specific IP addresses.
Solution
Warning
Firewall rules added manually will NOT appear in the FASTPANEL web interface! Be careful!
Well, if UFW is out of the question, let’s see how FASTPANEL implements its interaction with iptables. It turns out they run the netfilter-persistent service. And we can manually append our own rules; for example, FASTPANEL uses port 8888 by default, and we can allow access to it only for a single IP address and restrict access for any other IP address. To do this, add the following lines to the /etc/iptables/rules.v4 configuration file (replace IP 10.10.10.10 with your own):
-A fastpanel_rules -s 10.10.10.10/32 -p tcp -m tcp --dport 8888 -j ACCEPT
-A fastpanel_rules -p tcp -m tcp --dport 8888 -j DROP
Full configuration listing for IPv6 /etc/iptables/rules.v6. We add a rule for ICMP and IPs from which we allow access to all ports. Accordingly, we close access for everyone else to SSH and FASTPANEL:
# Generated by ip6tables-save v1.8.10 (nf_tables) on Mon Nov 18 11:09:05 2024
*filter
:INPUT DROP [0:0]
:FORWARD ACCEPT [0:0]
:OUTPUT ACCEPT [0:0]
:fastpanel_rules - [0:0]
-A INPUT -i lo -j ACCEPT
-A INPUT -j fastpanel_rules
-A INPUT -m conntrack --ctstate RELATED,ESTABLISHED -j ACCEPT
-A INPUT -p ipv6-icmp -m comment --comment "ICMP6" -j ACCEPT
#-A INPUT -p ipv6-icmp -m icmp6 --icmpv6-type 135 -j ACCEPT
#-A INPUT -p ipv6-icmp -m icmp6 --icmpv6-type 136 -j ACCEPT
#-A fastpanel_rules -p tcp -m tcp --dport 8888 -j ACCEPT
#-A fastpanel_rules -p tcp -m tcp --dport 22 -j ACCEPT
-A fastpanel_rules -p tcp -m tcp --dport 80 -j ACCEPT
-A fastpanel_rules -p tcp -m tcp --dport 443 -j ACCEPT
-A fastpanel_rules -s 2a09:xxxx:x:xx::x -j ACCEPT
-A fastpanel_rules -s 2a02:xxxx:xxxx:xxxx::x -j ACCEPT
-A fastpanel_rules -s 2a03:xxxx:xxxx::xxxx:xxxx -j ACCEPT
COMMIT
# Completed on Mon Nov 18 11:09:05 2024
Full configuration listing for IPv4 /etc/iptables/rules.v4.
# Generated by iptables-save v1.8.10 (nf_tables) on Mon Nov 18 11:09:05 2024
*filter
:INPUT DROP [0:0]
:FORWARD ACCEPT [0:0]
:OUTPUT ACCEPT [0:0]
:fastpanel_rules - [0:0]
-A INPUT -i lo -j ACCEPT
-A INPUT -j fastpanel_rules
-A INPUT -m conntrack --ctstate RELATED,ESTABLISHED -j ACCEPT
#-A fastpanel_rules -p tcp -m tcp --dport 8888 -j ACCEPT
#-A fastpanel_rules -p tcp -m tcp --dport 22 -j ACCEPT
-A fastpanel_rules -p tcp -m tcp --dport 80 -j ACCEPT
-A fastpanel_rules -p tcp -m tcp --dport 443 -j ACCEPT
-A fastpanel_rules -s xxx.xxx.xxx.50/32 -j ACCEPT
-A fastpanel_rules -s xxx.xxx.0.0/19 -j ACCEPT
COMMIT
# Completed on Mon Nov 18 11:09:05 2024
To apply the new rules, restart the netfilter service:
systemctl restart netfilter-persistent.service
Step 8: How to configure HTTPS access for FASTPANEL, RoundCube, and phpMyAdmin
By default, FASTPANEL allows access to its management panel, RoundCube webmail, and phpMyAdmin via IP and a self-signed SSL certificate. Browsers complain about this. We can tidy up this behavior. You can access the panel via HTTPS protocol—for this, you will need to add a domain (or subdomain) as the panel address and issue an SSL certificate for it.
- Go to the “Settings” — “Main” section and select the “Panel Addresses” tab.
- Click “Add Address” and enter the domain or subdomain you want to use to open the panel. The domain must have your server’s IP address set as its A-record.
- Click “SSL” and choose the “Let’s Encrypt” option.
Now you can open your mailbox in a browser without provoking its wrath 🙂 via the link https://yourdomain.com:8888/webmail/
Step 9: Email Configuration in FASTPANEL
To configure mail on a server with FASTPANEL, first, we need a DNS server. You can install and configure it inside FASTPANEL, but to avoid resolution delays and other issues, I recommend using the DNS servers of your domain registrar.
- In the FASTPANEL panel, install the bind9 application. To do this, go to “Settings” — “Applications”, locate bind9 in the list, and click the install icon.
- In FASTPANEL, go to “Management” — “Mail”. Click on “New Domain”. Enter your domain and save changes.
- In FASTPANEL, go to “Management” — “DNS Domains”. If your domain is not there, create it. Then click on “DNS Records”.
- DNS configuration for the domain (reminding you that I configure these settings at the domain registrar, not in FASTPANEL). On the NS server provider side, configure the DNS records (A, MX, DKIM, SPF, DMARC) using the values provided in FASTPANEL.
- Generally, the configuration can be completed here, and you can proceed to create mailboxes. If your mail domain matches the website domain created in FASTPANEL and an SSL certificate has already been issued for it, you only need to perform one final step: go to “Management” — “Mail”. Click on the gear icon next to the mail domain. In the “Certificate” option, select the issued SSL and click “Save”.
- Creating a mailbox. Go to “Management” — “Mail” and click on “Mailboxes”. Click on “New Mailbox”. Fill out the fields and click “Save”.
Details for configuring email clients can be obtained by clicking the icon next to the mailbox name. If you configured an SSL certificate, you can also use encrypted ports: IMAP — 993, SMTP — 465, POP3 — 995.
Checking FASTPANEL Email Operation
Mail records in DNS usually update within 1 hour. Try sending emails to Gmail and replying to them. We verified mail works in both directions. That’s good, but not enough 🙂 Next, check with the service https://www.mail-tester.com and aim to achieve a score of 10 points.
Step 10: Backups: Remote and Local Backup
In FASTPANEL, backup configuration is set up in two steps: first, a storage account is created (where to place backups), and then a plan (what and how often to copy). FASTPANEL currently supports backups to these types of storage:
- Local storage — a local directory on the server itself.
- FTP — standard FTP storage (including backup storage provided by a hoster).
- SCP / SFTP — remote servers via SSH protocol.
- S3-compatible storage — any S3-compatible storage (MinIO, AWS S3, etc., for differential backups).
- Dropbox — Dropbox cloud via account linking.
- Google Drive — Google Drive cloud via OAuth authorization.
- FASTBACKUP — proprietary backup boxes from FASTPANEL.
Log into FASTPANEL under the admin account. Short summary of actions:
- Open the “Management” → “Backups” section.
- On the “Accounts” tab, create a new backup storage account (local disk, FTP/SCP, or cloud). Specify the name, type, host/path, login, password, and, if necessary, an email for notifications.
- Save the account and make sure there are no connection errors.
Creating a backup plan:
- Go to the “Plans” tab and click “New Plan”.
- Set:
- Plan name (e.g., daily-backup).
- Storage account (select the one created earlier).
- Copy limit (how many backups to keep concurrently).
- Schedule (daily/weekly or manually via “Custom”).
- Which sites and databases to include in the backup.
- Save the plan — backups will start being created in the chosen storage according to the schedule.
Manual run and restoration:
- In the plans list, you can launch a backup manually using the run button.
- Through the view icon, open the list of created copies:
- Launch the restoration of the required backup copy.
- If necessary, download the backup to the server or local computer.
- Delete old copies if you need to free up space.
Step 11: Advanced Nginx Tuning (Global Buffer Optimization)
By default in FASTPANEL, Nginx buffering parameters for handling heavy PHP scripts are not specified and run on the default values of the webserver itself (usually 4k or 8k).
If your site (for example, a WordPress site with a heavy theme or plugins) starts throwing an avalanche of warnings or notices (“PHP Warning: Undefined array key”) during the execution cycle, FastCGI (PHP-FPM) packs all this junk into the HTTP response headers. The Nginx buffer overflows instantly, and the server drops into a 502 Bad Gateway error, interrupting script execution (e.g., during bulk deletion of spam comments in the admin area), and the Nginx logs show the following entry:
upstream sent too big header while reading response header from upstream
To prevent such situations and accelerate Page Generation Time (TTFB), it is highly recommended to configure global Nginx buffers. On servers with RAM capacity from 4 GB RAM and above, you can confidently use a configuration close to high-load production environments (similar to how it’s done by default in CloudPanel).
Safe configuration via a global include
The default Nginx configuration file from FASTPANEL includes processing custom files from the `/etc/nginx/conf.d/` directory. This is the ideal place, as the panel will never overwrite files in this directory during its updates.
Connect to the VPS via SSH and execute the following command, which will create a configuration file with your comments and optimal limits:
cat << 'EOF' > /etc/nginx/conf.d/custom_fastcgi_global_buffers.conf
# ====================================================================
# Created by DarkFire: Global FastCGI buffers optimization (4GB+ RAM)
# Prevents 502 errors and accelerates TTFB by processing in-memory
# ====================================================================

fastcgi_buffer_size 64k;   # With headroom for any avalanche of PHP warnings and heavy cookies
fastcgi_buffers 64 16k;    # Up to 1 MB of page data is processed directly in RAM
EOF
Verification and configuration application
After creating the file, be sure to verify that Nginx parsed and merged the configurations correctly:
nginx -t
If the test is successful (“syntax is ok”), gracefully reload Nginx to apply the parameters in production without stopping websites:
systemctl reload nginx
How to verify that the configurations were applied globally?
You can verify the final configuration layout from Nginx’s memory by filtering via grep:
nginx -T | grep -i fastcgi_buffer
In the console output, you will see your new parameters `64k` and `64 16k`, which are now automatically and in an isolated manner applied to all websites on this VPS, protecting them from “silent” admin panel crashes.
FAQ 1: How to reset the password to log into FASTPANEL
If you forgot or misplaced the password to log into FASTPANEL, but you have SSH access, the password can be changed just like for a standard user using the passwd command:
passwd fastuser
Or via the multi-functional utility mogwai included in FASTPANEL:
mogwai chpasswd --username=fastuser --password=YOUR_PASSWORD
FAQ 2: How to update the FASTPANEL panel
I usually log in via SSH and execute the binary file from the FASTPANEL distribution. As you can see in the log, repositories are updated and new package versions are installed after execution:
root@best:~# /usr/local/fastpanel2/app/updater
[2024-07-31T11:33:50-04:00]  INFO Retrieve FASTPANEL installed package list
[2024-07-31T11:33:50-04:00]  INFO CMD: dpkg '-l'
[2024-07-31T11:33:50-04:00]  INFO package: fastpanel2, current version: 1.10-ubuntu24.04p539, candidate version: 1.10-ubuntu24.04p548
[2024-07-31T11:33:51-04:00]  INFO CMD: apt-get 'update'
[2024-07-31T11:34:00-04:00]  INFO Start update 'fastpanel2' package
[2024-07-31T11:34:00-04:00]  INFO CMD: apt-get 'update'
[2024-07-31T11:34:09-04:00]  INFO CMD: apt-get 'install' 'fastpanel2' '-y' '-o' 'Dpkg::Options::=--force-confdef' '-o' 'Dpkg::Options::=--force-confold' '--force-yes' '--allow-unauthenticated'
[2024-07-31T11:35:29-04:00]  INFO Package 'fastpanel2' have been updated successful
root@best:~#
FAQ 3: Nginx fails to start after VPS reboot (2 solutions)
The problem is almost always that Nginx crashes during autostart (configuration error or IP/port binding issue), while starting normally when executed manually after network interface initialization. On a VPS, Nginx sometimes attempts to start before the network/IP addresses are fully up, resulting in an error such as “Cannot assign requested address” on IPv4/IPv6.
Check exactly why the webserver failed to start:
systemctl status nginx -l
journalctl -u nginx -b
Pay attention to lines like nginx: [emerg] … or bind() to … failed.
Solution 1:
Ensure Nginx starts after the network is fully up. To do this, create a systemd override for the unit:
systemctl edit nginx
A file will open where all lines are commented out. Important: do not uncomment the block below, but add your new [Unit] section at the very top:
[Unit]
After=network-online.target remote-fs.target nss-lookup.target
Wants=network-online.target
Apply and verify:
systemctl daemon-reload
systemctl restart nginx
reboot
Solution 2: Simply use cron to manually start Nginx with a delay, and that’s it.
crontab -e
Add this line at the end:
@reboot sleep 20 && /bin/systemctl start nginx
This way, cron will wait 20 seconds upon each reboot before launching Nginx.
FAQ 4: How to run a Python bot in FASTPANEL
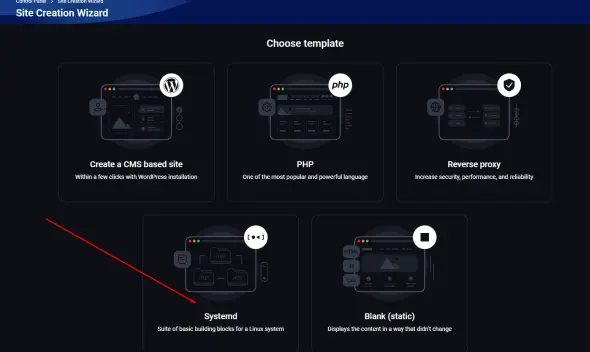
Earlier I described several solutions for working with Python:
Since I often use FASTPANEL on my servers and noticed that recent versions introduced the ability to create projects with execution support via Systemd, I decided to look into running a Telegram bot written in Python. Let me say right away 🙂 I crashed the VPS immediately, and PEP 668 didn’t help. Use the link for instructions on how to do it correctly the modern way without breaking anything: Python Modules.
Conclusion
If the configuration or capabilities of this specific panel did not suit you, you can return to the main page to continue choosing a control panel. There we deployed an interactive configurator table: with its help, you can filter all available software with a single click by Nginx/Apache support, license type, backup availability, or WordPress/Docker integration.
If you haven’t decided on the server requirements yet, read our related materials:
- Comparative review: Rating of Hosting Control Panels for Servers.
- Configuration manual: Checklist: Configuring Linux VPS/VDS/Dedicated Server.
I hope this guide was helpful to you. Let me give you one more tip: if you installed any control panel on your server, try to make all changes exclusively through the panel! Use the SSH console to edit configuration files only in exceptional circumstances.
 Top Temporary VPS for Testing & Experiments (2026)
Need a fast cloud server for a few hours or days? Deploy an isolated testing environment, run your scripts, and destroy it without any monthly commitments. Secure payments via Crypto (USDT) & PayPal supported.
• Exclusive Welcome Bonus: Get an extra 15% on your first balance top-up within 24 hours after registration.
• Best-in-class Storage VDS configurations with huge disk space for heavy data testing.
• High-speed hardware platform with a stable presence in the Netherlands (Europe).